SMART Boards
This web based tutorial was created and shared by some of my classmates in one of my courses. It is a very thorough tutorial that was created to have something to offer all levels of SMART Board users. There may be something within this tutorial that could help you enhance your use of your SMART Board as a learning tool in your lessons.
Visit the tutorial website here.
Visit the tutorial website here.
Creating a Reset Button
When you are creating an interactive lesson in which your created slides are altered a great deal by you and/or your students, you might want to create a reset button for the page so that you do not have to 'undo' all of these changes, especially if you accidentally save those changes. You can use the 'page recorder' feature to make a reset button. Once your page is ready to go, simply use the page recorder to record a few seconds of time, but do not make any changes at all to the slide during this recording period. Stop the recorder after a few seconds and a playback tool bar will appear on the slide. From now on after you have used the slide in your lesson and you would like it to go back to its original form, all you need to do is press play on the tool bar and your slide will revert back to its original form (the state that it was in during your recording period). I have added in a sample video below demonstrating this process.
Quick Copying
There is a really quick and easy way to make duplicate copies of images and text in SMART Notebook. This quick copying method requires your mouse and your keyboard, but it is very easy to master. First, select the text or the image that you would like to duplicate by simply clicking on it with the mouse. Once the image or text is selected, hover your mouse cursor over the image or text and hold down the control key. Next, left click the mouse while dragging the cursor off of the selected text or image somewhere else on the page. Voila! You now have an exact duplicate without having to use copy and paste.
Simple Animation
Did you know that you can program simple animations into your SMART Board lessons to make them more engaging and interactive?
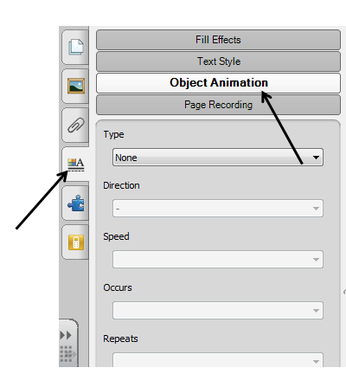
Step 1: When you're in the SMART Notebook file that you want to create an animation within, select the object that you would like to animate by clicking on it. Once the object or text has been selected, click on the tab with the coloured square and capital A to bring up the options seen here in the picture. To animate something on the page, you will want to select the option that says 'Object Animation.'
Step 2: Select the type of animation that you would like to use (you have many to choose from) from the drop down menu. You can also program things like the speed at which the animation will play. I have included a few examples in the attached Notebook file.
| animation_demo.notebook |
Inserting a Browser
As a fairly experienced SMART Board user, much of the above mentioned tutorial was familiar to me already. There was one tip in particular though that I learned while viewing this resource that I wanted to make note of here. Did you know that you can use a web browser from within SMART Notebook without ever needing to leave the file you are using for your lesson? Follow these steps or watch the video to find out how to do this in just a few easy to follow steps.
Step 1: Open the file that you would like to insert a browser into.
Step 2: Create a new page or find the page that you would like the browser to appear on.
Step 2: Create a new page or find the page that you would like the browser to appear on.
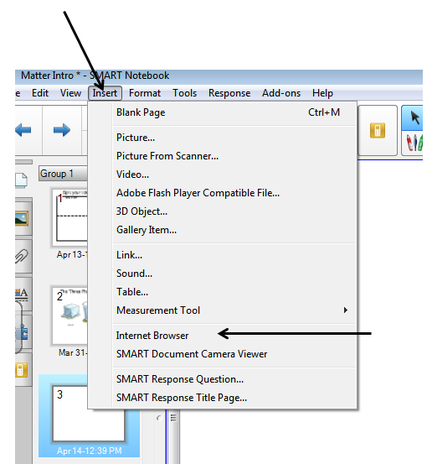
Step 3: Go to the 'Insert' tab and select the option that says
'Internet Browser.' Click on this and a browser window will appear within the SMART Notebook page that you are currently on.

Step 4: If you would like to have the browser locked on to a certain website, you simply need to 'Pin the Page' once you have the desired URL copied into the address bar at the bottom of the browser. Please note: if you do not 'pin' the website address, it will be lost when the file is closed.
For more information about this tech tip, you can view the video below.